There are two implementations of this project. One utilizes cloud storage, while the other relies on local storage.
Tip
Before settings up this project, install Python 3.8 or later. Support for Python 3.7 and earlier may be deprecated
for some dependencies in this project.
Attention
This setup is for MAC OS only using Z shell (zsh). I will be providing setup instructions for Windows OS in a later update.
After installing PostgreSQL, you will need to complete the below steps so that the psql command will work in Terminal.
These steps will add the PostgreSQL binaries path to the paths file on your computer:
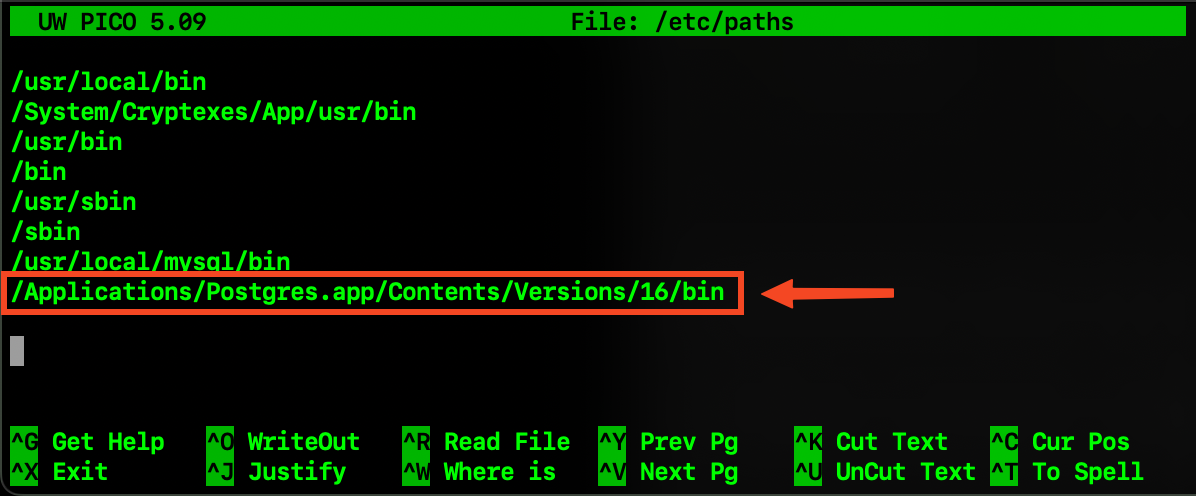
Open Terminal and type sudonano/etc/paths, then press Enter to open the paths file.
Note
You will be prompted to enter a password to edit the paths file.
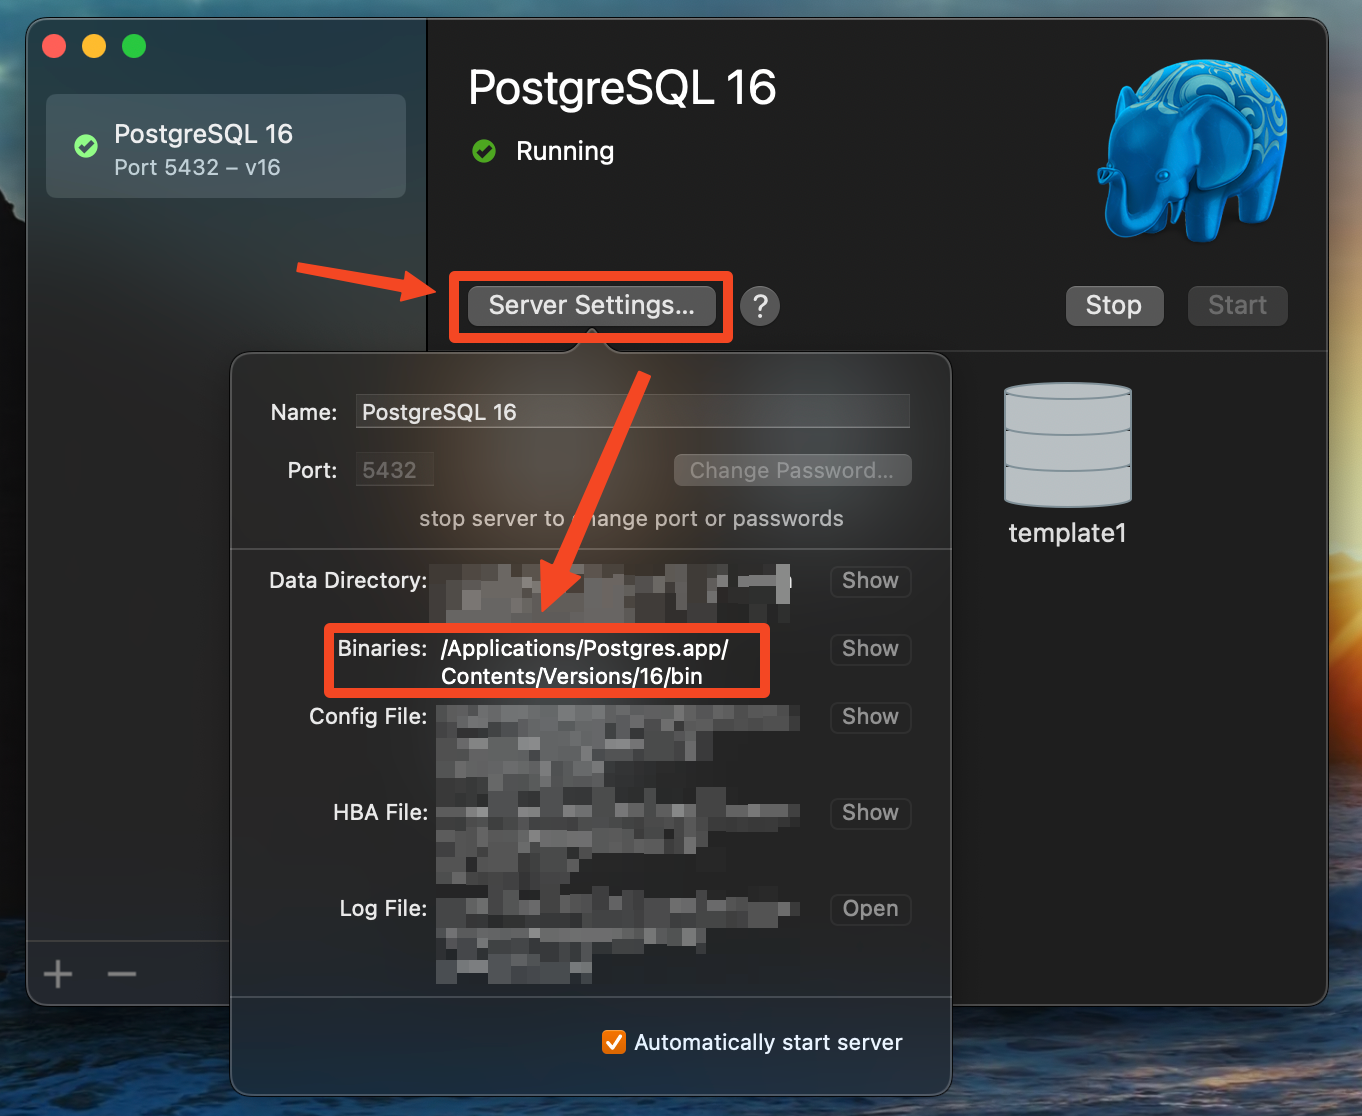
Open the PostgreSQL app and make sure the server is runnning by clicking Start.
Click on Server Settings and copy the binaries path.
Paste the binaries path in the paths file in Terminal.
Press Control+O, then Enter to save the contents to the paths file.
Lastly, press Control+X to exit the paths file.
Close Terminal and relaunch it.
Upon relaunching Terminal, you should find that you can now utilize the psql command.
Caution
If you do not complete the above steps, then you will get psql:commandnotfound when trying to execute the psql command in Terminal.
The below setup is for the local implementation only. If you’re not using the local setup, please skip to Clone GitHub Repo.
We need to set a password for the local database connection which will be used later to connect dbt.
Enter the below in Terminal to launch the PostgreSQL command line interface (CLI):
psql-Upostgres
To set the password, enter \passwordpostgres. You’ll be prompted to create a password.
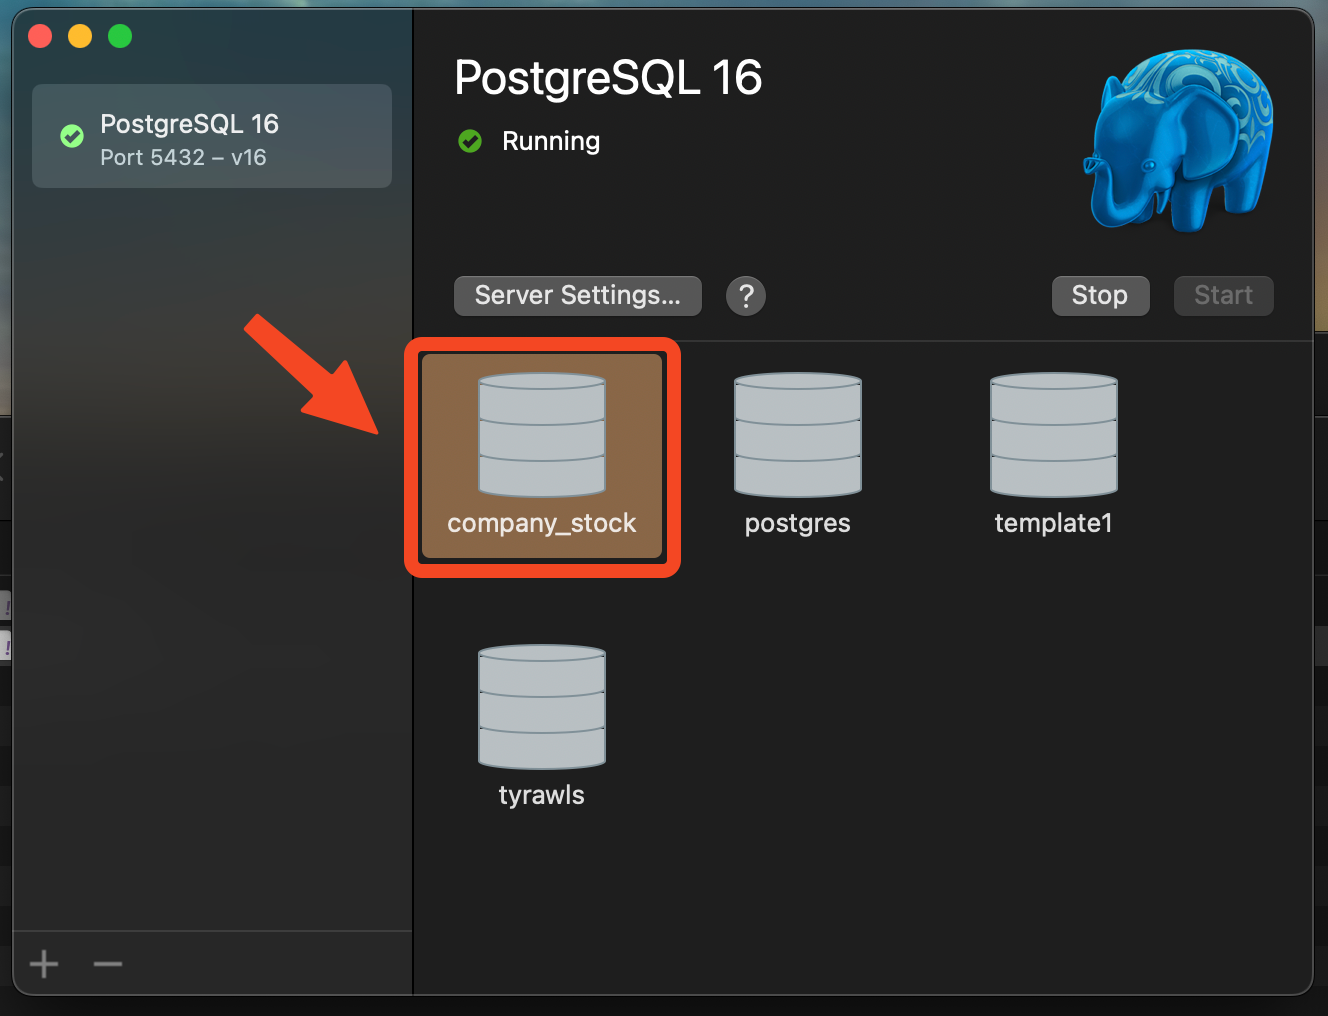
You must establish a database called company_stock to store the stock data.
Enter the below command in the PostgreSQL CLI:
CREATEDATABASEcompany_stock;
Upon successful creation, you should observe it within the PostgreSQL app. Open the PostgreSQL app to verify that the database was created
Navigate to the cloud or local storage directory in Terminal after you have cloned the GitHub repository:
cdportfolio-optimization/cloud-storage# directory for cloud setupcdportfolio-optimization/local-storage# directory for local setup
Note
You only need to choose one directory. The local directory is more simple, but the cloud directory requires more setup.
To configure the cloud setup, you’ll be required to establish three components within Amazon Web Services (AWS).
You will need to create a S3 bucket to stage your data before it goes to the database.
To gain access to read and write data to the S3 bucket from your device, you must acquire your AWSAccessKeyID and AWSSecretAccessKey.
These credentials can be obtained from your AWS account within the
Security Credentials section.
Once you’ve obtained your AWS keys, you will need to configure them by executing the below in Terminal to access the AWS CLI:
awsconfigure
You will be prompted to enter the below:
AWSAccessKeyID
AWSSecretAccessKey
Defaultregionname (optional)
Defaultoutputformat (optional)
Once you’ve set your AWS keys, you may view your credentials by entering the below in a new Terminal window:
cd~&&cd.aws&&nanocredentials
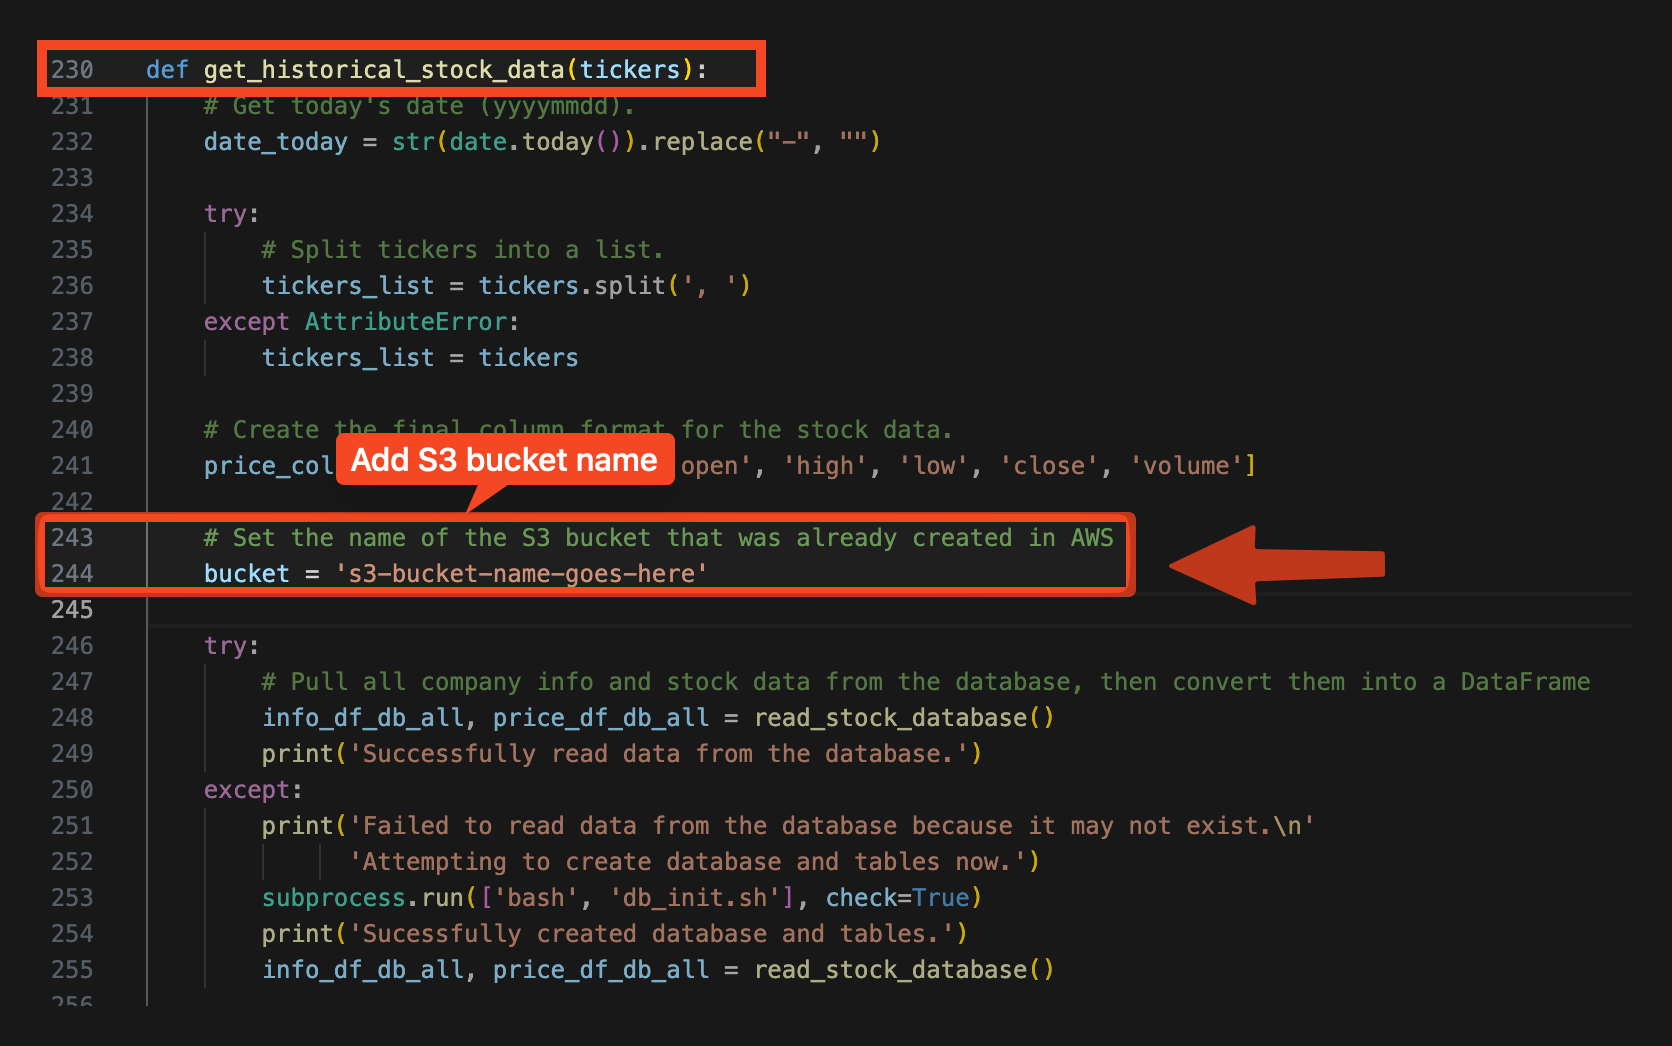
Finally, you’ll need to modify the bucket variable in the utils.py file located in the cloud-storage folder,
specifically on line 244, with the name of your S3 bucket. If you cannot view the line numbers, then you can locate the
bucket variable inside the get_historical_stock_data() function.
When data is stored into the S3 bucket, a PutObject event occurs. This event can be used as a trigger to transfer data from S3 to RDS (PostgreSQL).
You will need to complete the following:
Create a Lambda Function with a Python 3.8 runtime
Create a Trigger and select the S3 bucket you created as the Source
Set the Trigger Event Type to PUT and click Add to create the trigger
From the Lambda Function, click on the Upload From button and upload the lambda_function.zip file located in portfolio-optimization/cloud-storage/aws-lambda-package/zip-files
Create a Lambda Layer with a Python 3.8 runtime and upload the python.zip file located in portfolio-optimization/cloud-storage/aws-lambda-package/zip-files
Click on Configuration > General configuration and set the Timeout to 30 secs.
Click on Configuration > Environment variables and create Environment Variables for your RDS (PostgreSQL) connection. You will need to set the Key and Value with your database credentials.
While in the local-storage or cloud-storage folder, switch to the dbt project folder and initialize the project:
cdportfolio_optimization_project_dbt&&dbtinit
You will be prompted to select a database by entering a number. Enter the number for the Postgres database and
press enter. You should see the something like the below:
The brackets will need to be removed for each input and the password would need to be in single quotes.
host: If you are configuring this locally, then assign this value to localhost. If you’re using the cloud setup then you will need to enter the AWS RDS endpoint you created.
dev_username: If you are configuring this locally, then assign this value to postgres. If you’re using the cloud setup then you will need to enter the AWS RDS username you created.
dev_password: If you are configuring this locally, then assign this value to the password you created in the PostgreSQL Setup. If you’re using the cloud setup, then you will need to enter the AWS RDS username you created.
To save the profiles.yml content:
Press Control+O, then Enter to write to the profiles.yml file.
Lastly, press Control+X to exit the profiles.yml file.
Close this Terminal
Go back to the initial Terminal and test the database connection:
dbtdebug
If done correctly, the output will show “All checks passed!”. If not, you will need to verify that the profiles.yml file has the correct info.
To integrate your database credentials and Financial Marketing Prep (FMP)
API key, you’ll need to create a source file to add the information. If you haven’t done so already, sign up for the API to obtain a FREE key.
For local setup, add the below to the .portoptrc file:
# Local (``PostgreSQL``) credentialsexportLOCAL_HOST="localhost"exportLOCAL_PORT="5432"exportLOCAL_USER="postgres"exportLOCAL_DBNAME="company_stock"exportLOCAL_PASS=[PASSWORD]# Financial Marketing Prep (FMP) API URL and keyexportFMP_API_URL="https://financialmodelingprep.com/api/v3/profile/"exportFMP_API_KEY=[APIKEY]
You will need to add your credentials to the inputs in the brackets.
Press Control+O, then Enter to write to the .portoptrc file.
Lastly, press Control+X to exit the .portoptrc file.